
HTTP Tunneling Configuration
Introduction
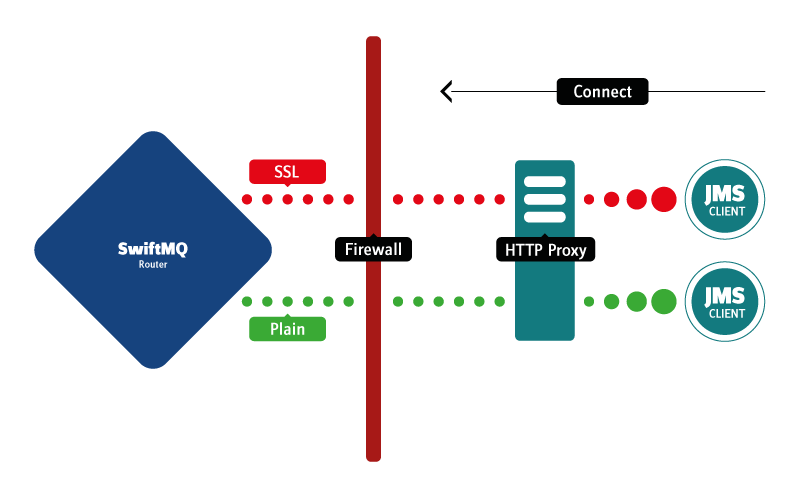
In many cases, it is not possible to establish a connection between JMS clients and a SwiftMQ Router if one part stands behind a firewall. Usually, it exists a proxy server to which it is allowed exclusively to establish an internet connection by a firewall.
To avoid this fact, an operation called HTTP tunneling is used. This document describes the implementation and the setup of the HTTP tunneling with SwiftMQ.
How SwiftMQ implements HTTP Tunneling
When an HTTP connection is made through a proxy server, the client (usually the browser) sends the request to the proxy. The proxy opens the connection to the destination, sends the request, receives the response, and sends it back to the client.
The HTTP protocol specifies a request method called CONNECT. The CONNECT method can be used by the client to inform the proxy server that a connection to some host on some port is required. The proxy server, if it allows such connections, tries to connect to the destination address specified in the requested header. If the operation fails, it sends a negative HTTP response back to the client and closes the connection. If the operation succeeds, it sends back an HTTP positive response, and the connection is considered established. After that, the proxy does not care what data is transferred between the client requesting the connection and the destination. It just forwards data in both directions, acting as a tunnel.
Implementations of these tunneling features are commonly referred to as "SSL tunneling" because HTTPS is implemented in this way, although, it can be used for tunneling any TCP-based protocol.
With SwiftMQ it is possible to tunnel plain socket and TLS connections via HTTP.
Setting up HTTP Tunneling
The setup of HTTP tunneling takes place by a property file named httptunnel.properties. This needs either to exist in the CLASSPATH or to be specified while starting the application:
-Dswiftmq.httptunnel.file=<filename>Is the file founded in CLASSPATH or specified with -D at startup, HTTP tunneling will occur, otherwise not.
The file contains the following properties:
Property Name | Description |
|---|---|
| DNS name of the HTTP proxy, by which it should be tunneled. |
| Portnumber of the HTTP proxy, by which it should be tunneled. |
| Only if the access results on the proxy by username/password authentication. Specifies the username to the proxy. |
| Only if the access results on the proxy by username/password authentication. Specifies the password to the proxy. |
| Contains a list of hostnames to which no HTTP tunneling should result. The hostnames might be indicated as SQL-Like predicate. Here, the percent character '%' is considered to be a replacement character to any character, the underscore '_' to a single character. Escape sign is '\'. |
Example:
    proxy.host=pamela.iit.de
    proxy.port=3128
    proxy.username=muelli
    proxy.password=secret
    noproxy.host.names=localhost,dev%.iit.de,mail.iit.de
Tunneling JMS Client Connections
HTTP tunneling of JMS client connections is defined by the corresponding JMS clients. Concerning the SwiftMQRouter, no further configuration is required. The JMS client defines its HTTP proxy by the file httptunnel.properties and provides the file either in CLASSPATH or defines it by starting the application with -D. The tunneling now takes place automatically.
The property file is loaded once, because the resp. SwiftMQ class is a singleton. However, there is a proprietary way to reload properties, e.g. to try another HTTP proxy without the need to terminate the JMS application:
    import com.swiftmq.net.*;
    import java.util.*;
    ...
    Properties prop = new Properties();
    // set the new proxy properties
    ...
    // reload the properties
    HttpTunnelProperties.getInstance().reload(prop);
One can also specify a file name for the new property file:
    import com.swiftmq.net.*;
    ...
    // reload the properties
    HttpTunnelProperties.getInstance().reload("newproxy.properties");
Tracing HTTP Tunneling
The communication between a JMS client and an HTTP proxy might be pursued. To this, while calling the JMS client, put the property swiftmq.httptunnel.debug to the value true. The HTTP requests and responses are reported on the System.out.
Example:
-Dswiftmq.httptunnel.debug=trueTroubleshooting
At any rate, adjust first the debug mode (-Dswiftmq.httptunnel.debug=true).
The JMS client always tries to establish a direct connection
Verify if the file httptunnel.properties in the CLASSPATH exists or define it at your command line explicitly with -Dswiftmq.httptunnel.file=<file>. Please verify furthermore if the host you want to connect is not defined in the property noproxy.host.names.
No connection might be established to a proxy
Verify if the properties proxy.host and proxy.port is set right. The values need to point at your HTTP proxy. Please verify if your proxy demands an authentification and, if necessary, specify proxy.user andproxy.password.
It might also be that your proxy only permits the tunneling by the Standard-SSL Ports. In general, these are the ports 443 and 563. In this case, the JMS resp. the routing listener of the SwiftMQ Router, to which a connection should be established, needs to listen on one of these ports.
The proxy closes the connection after a while
Normally, a proxy only closes connections if nothing is sent on them. SwiftMQ offers hereto the keep-alive interval. Adjust this to a lower value, e. g. 30000 (30 seconds).